Converting Wayne Dalton TorqueMaster Original to Wayne Dalton TorqueMaster Plus
A Simple, Practical Guide for Homeowners and Installers
If your garage door uses a Wayne Dalton TorqueMaster system and the spring has failed, you’ve probably discovered something frustrating: original TorqueMaster parts are increasingly hard to find.
That’s where TorqueMaster Plus comes in.
This guide explains:
-
The difference between TorqueMaster Original and Plus
-
Why conversion often makes more sense than direct replacement
-
What parts are required
-
A simplified step-by-step overview
-
Smart tips to avoid common mistakes
Let’s break it down in plain English.
First: What Is the TorqueMaster System?
Unlike traditional exposed torsion springs, TorqueMaster systems use springs hidden inside a metal tube above the garage door.
Advantages:
-
Cleaner appearance
-
Enclosed springs for added safety
-
Factory-engineered system specific to Wayne Dalton doors
The issue? The Original TorqueMaster (TM1) design is now outdated.
TorqueMaster Original vs. TorqueMaster Plus
Here’s what changed.
TorqueMaster Original (TM1)
-
Older design (common on pre-2007 doors)
-
Round winding cone
-
Different cable drums and end brackets
-
Limited replacement part availability
TorqueMaster Plus (TM3 / TMP)
-
Updated engineering
-
Improved winding mechanism
-
Stronger, more durable internal spring design
-
Better long-term parts support
In simple terms:
TorqueMaster Plus is the modern replacement platform.
If you’re replacing a broken spring, conversion is usually the smarter long-term decision.

Why Convert Instead of Just Replacing?
Here are the practical benefits.
1. Better Parts Availability
Original TM1 springs are discontinued in many sizes. TM Plus components are widely available.
2. Improved Durability
The Plus system offers smoother winding and better cycle life.
3. Easier Future Maintenance
Once converted, future spring replacements are simpler and more accessible.
4. Cleaner Upgrade Path
Instead of hunting for rare parts again in a few years, you move to the current system standard.
If you plan to stay in your home, conversion prevents repeat headaches later.
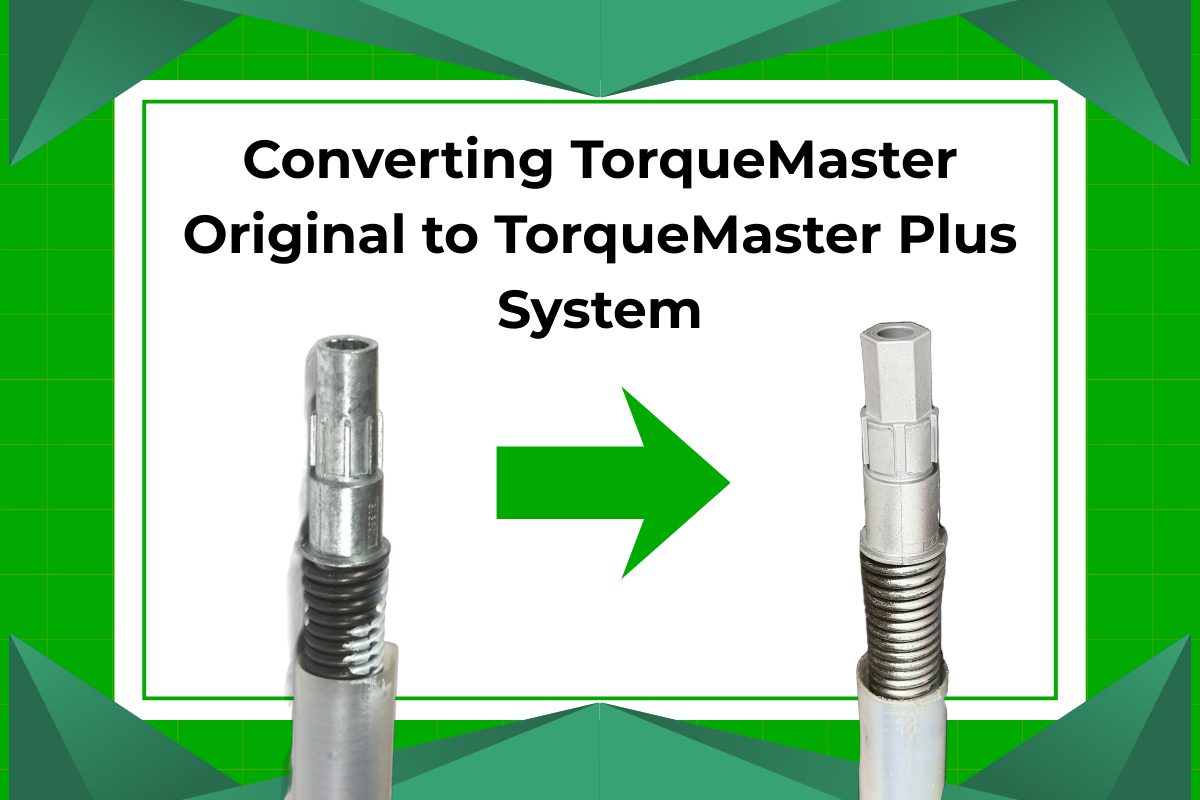
How to Identify Your Current System
Before ordering parts, confirm what you have.
You likely have TorqueMaster Original if:
-
The winding cone is round
-
The spring end is not clearly visible on the right side
-
The tube label says TM or TM1
You likely have TorqueMaster Plus if:
-
The winding cone is hex-shaped
-
Larger locking lugs are visible
-
The tube label says TM3 or TMP
When in doubt, take clear photos of:
-
The end bracket
-
The winding assembly
-
The full spring tube
This prevents ordering the wrong kit.
What You Need to Convert to TorqueMaster Plus
Conversion requires more than just new springs. The systems use different hardware.
You will need:
-
TorqueMaster Plus spring(s) (correct size for door height & weight)
-
Plus winding assembly
-
Plus cable drums
-
Center support bracket
-
Proper mounting hardware
Important:
Original springs are NOT compatible with the Plus winding system.
If your door has two springs, replace both. Mixing old and new springs causes uneven lifting and early failure.
Safety First: Read This Carefully
Garage door springs are under high tension.
Improper handling can cause:
-
Serious injury
-
Broken components
-
Door imbalance
If you are not experienced with torsion systems, consider hiring a professional installer.
If proceeding yourself:
-
Disconnect the opener
-
Fully close the door
-
Secure the door in place
-
Follow manufacturer torque instructions precisely
Never improvise winding tools.
Simplified Step-by-Step Conversion Overview
This is a high-level overview. Always follow the official installation instructions (Found HERE).
Step 1: Release Tension from the Original System
Carefully unwind the existing spring using proper tools.
Step 2: Remove Original Hardware
Remove:
-
Winding assembly
-
Cable drums
-
End brackets
-
Spring tube
Inspect the flag angles and mounting surfaces for damage.
Step 3: Install the TorqueMaster Plus Brackets
Mount:
-
New end brackets
-
Center support bracket
Ensure everything is level and securely fastened.
Step 4: Install New Spring(s) into Tube
Insert the correct Plus spring(s) into the tube assembly.
Verify:
-
Correct orientation (left-wind vs right-wind)
-
Proper positioning inside the tube
Step 5: Install Cable Drums
Attach Plus cable drums and ensure cables are properly seated and aligned.
Step 6: Apply Spring Tension
Wind according to the manufacturer’s turn chart.
Do not guess the number of turns.
TorqueMaster Plus Spring Turns Chart
(Recommended winding turns based on door height for standard residential doors)
| Door Height | Recommended Turns per Spring |
|---|---|
| 6′-0″ | 14 |
| 6′-3″ | 14½ |
| 6′-5″ to 6′-6″ | 15 |
| 6′-8″ to 6′-9″ | 15½ |
| 7′-0″ | 16 |
| 7′-3″ | 16½ |
| 7′-6″ | 17 |
| 7′-9″ | 17½ |
| 8′-0″ | 18 |
| (Variations ±½ turn may be needed to fine-tune balance) |
Step 7: Test Door Balance
With opener disconnected:
Lift the door halfway.
The door should:
-
Stay in place
-
Not drift up
-
Not fall down
If it moves significantly, adjust spring tension slightly.
Pro Tips for a Smooth Conversion
Measure Before Ordering
Know:
-
Door height
-
Door width
-
Door model (if available)
-
Single vs double spring system
Replace Both Springs
Even if only one is broken, replace both in a dual-spring system.
Inspect Cables and Rollers
Conversion is the perfect time to check:
-
Frayed cables
-
Worn rollers
-
Bent brackets
Small upgrades now prevent service calls later.
Do Not Over-Tension
Too much tension stresses the system and shortens spring life.
Balanced is better than tight.
When Should You NOT Convert?
Conversion may not be ideal if:
-
The door itself is severely damaged
-
The track system is failing
-
You plan to replace the entire door soon
In those cases, a full door upgrade may be more cost-effective.
Final Thoughts
Upgrading from TorqueMaster Original to TorqueMaster Plus is less about repair and more about modernization.
You gain:
-
Better parts support
-
Improved reliability
-
Easier maintenance
-
A system designed for current production standards
If your spring has failed, this is usually the best time to convert.


